Wood carving is a fun hobby that you can do for your whole life. It’s great to make things with your hands. If you like shaping wood and are thinking about getting the Wood Carving badge, there’s more to learn than just simple whittling.
So, what’s the difference between whittling and wood carving? Simply put, whittling is just using a knife to shape wood. On the other hand, wood carving is like an art where you use different tools to create detailed designs on wood.
In wood carving, it’s essential to plan what you want to make (that’s the design) and know how to use the tools to make it (that’s the technique). Also, the type of wood you choose matters. Some woods work better for different projects and tools.
Before you start, you need to learn about safety. Wood carving can be dangerous if you don’t know the safe way to do it. Once you’ve got all this knowledge, you’re ready to go for the Wood Carving badge. Good luck!
Wood Carving Merit Badge Requirements
- Do the following:
- Explain to your counselor the hazards you are most likely to encounter while wood carving, and what you should do to anticipate, help prevent, mitigate, or lessen these hazards.
- Show that you know first aid for injuries that could occur while wood carving, including minor cuts and scratches and splinters.
- Do the following:
- Earn the Totin’ Chip recognition.
- Discuss with your merit badge counselor your understanding of the Safety Checklist for Carving.
- Do the following:
- Explain to your counselor, orally, or in writing, the care and use of five types of tools that you may use in a carving project.
- Tell your counselor how to care for and use several types of sharpening devices, then demonstrate that you know how to use these devices.
- Using a piece of scrap wood or a project on which you are working, show your merit badge counselor that you know how to do the following:
- Paring cut.
- Basic cut and push cut.
- “V” cut.
- Stop cut or scoreline.
- Tell why different woods are used for different projects. Explain why you chose the type of wood you did for your projects in requirements 6 and 7.
- Plan your own or select a project from this merit badge pamphlet and complete a simple carving in the round.
- Complete a simple low-relief OR a chip carving project.
1. (a) Anticipating and Preventing Hazards in Wood Carving
| Hazards in Wood Carving | Anticipate | Prevent | Mitigate |
|---|---|---|---|
| Cuts from tools | Be aware of the tool’s sharpness and the direction you’re carving. | Carve away from yourself. Use sharp tools; dull ones require more force. | Use a carving glove on the hand holding the wood. If cut, clean and bandage immediately. |
| Wood splinters | Know the type and grain of the wood you’re carving. | Sand the wood’s surface before starting. Use appropriate tools. | Remove splinters with tweezers and clean the area. |
| Dust inhalation | Be aware of the wood type and how much dust it can produce. | Carve in a well-ventilated area. Wet the wood slightly to reduce dust. | Wear a dust mask, especially during sanding. |
| Eye injuries | Understand that wood chips can fly unexpectedly. | Always wear safety goggles. | Rinse eyes immediately if wood particles enter. Seek medical attention if irritation persists. |
| Repetitive strain | Recognize that prolonged carving can strain muscles. | Take breaks. Use ergonomic tools. | Stretch muscles regularly. Apply ice or heat as needed. |
By being proactive and knowing what hazards might come up, you can both prevent and lessen any risks associated with wood carving. Safety first!
1. (b) First Aid for Wood Carving Injuries
| Wood Carving Injuries | First Aid Steps |
|---|---|
| 1. Minor Cuts | 1. Wash your hands with soap and water. 2. Clean the cut gently with water and mild soap. 3. Apply an antibiotic ointment if available. 4. Cover with a sterile bandage. 5. Change the bandage daily, or when it becomes wet or dirty. |
| 2. Scratches | 1. Clean the area with mild soap and water. 2. Apply a gentle lotion or ointment if the scratch is dry or itchy. 3. Keep an eye on it to ensure it doesn’t become infected (red, swollen, warm to the touch). |
| 3. Splinters | 1. Wash your hands and the affected area. 2. Use tweezers sterilized with rubbing alcohol to gently remove the splinter. 3. If splinter is under the skin, sterilize a needle with alcohol and gently tease the splinter out. 4. Wash the area again and cover with a bandage. |
2. (a) Earn the Totin’ Chip Recognition
The Totin’ Chip is a special recognition that allows a Scout to carry and use specific woods tools. These tools include items like knives, axes, and saws.
Scouts can proudly display the Totin’ Chip emblem on the right pocket of their uniform as a temporary patch. Along with the emblem, they’ll receive a pocket card which should be carried in their uniform pocket to show their certification.
Here’s what a Scout must do to earn this certification:
1. Study Up
Scouts should thoroughly read and understand the rules for using woods tools safely. This information can be found in the Scouts BSA handbooks. It’s essential to know these rules by heart, as safety always comes first.
2. Skillful Handling
Demonstration is crucial. A Scout should show their leader (or someone their leader picks) how they can correctly handle, care for, and use three main tools: the pocketknife, the ax, and the saw. This isn’t just about using the tools but also about maintaining and storing them properly.
3. Respect the Tool
These tools are not toys. Scouts need to show they understand the seriousness of using a knife, ax, or saw. They should always be used with purpose and care.
4. Prioritize Safety
Safety isn’t just about the user; it’s also about those around. Scouts should ensure they always respect safety rules to keep themselves and others safe.
5. Honor Boundaries
The environment deserves respect too. This means Scouts should only cut trees, whether they are living or dead, when they have clear permission and a valid reason for doing so.
6. Commit to the Code
Scouts should fully endorse and follow the Outdoor Code. It’s a set of guidelines ensuring that Scouts act responsibly and respectfully when in the outdoors.
2. (b) Understanding the Safety Checklist for Carving
To ensure that every Scout has a safe and enjoyable carving experience, it’s essential to understand and follow a safety checklist. Here’s a breakdown of what such a discussion with a merit badge counselor might encompass:
- Proper Tool Handling
Every tool has a safe way to be held, used, and stored. It’s crucial to know how to grip carving tools correctly to prevent accidents and achieve precise cuts. - Workspace Safety
Having a clean, well-lit, and clutter-free workspace ensures that you can focus on your carving without distractions or obstacles. It also reduces the chances of misplacing tools or causing unintentional injuries. - Protective Gear
Using safety goggles can prevent wood chips from entering the eyes, and gloves can offer a better grip and reduce the risk of cuts. It’s always better to be safe than sorry. - Tool Maintenance
Sharp tools are safer because they require less force, reducing the chance of slips. Regularly checking and maintaining the sharpness of carving tools is crucial. - Respect the Material
Understanding the grain and structure of the wood you’re working with can prevent unwanted splits or breaks, making the carving process smoother and safer. - Stay Focused
Carving isn’t something to rush. Taking one’s time, taking breaks when tired, and always paying full attention when using tools can prevent many accidents. - First Aid Knowledge
Accidents can happen, even with precautions. Knowing basic first aid for cuts or punctures ensures that if something does go wrong, you’re prepared.
Also Read: First Aid Merit Badge
3. (a) How to Care and Use Carving Tools
1. Pocketknife (Whittler’s Knife)
Care: Regularly clean its blades. Use honing oil occasionally and sharpen when it becomes dull. Store in a dry place and apply a bit of oil to the blades and joints for added protection.
Use: This knife has three blades – master, sheep-foot, and pen. The master is all-purpose, sheep-foot is great for removing larger sections, and the pen is perfect for detailing, like facial features.
2. Straight Carving Knife
Care: Clean after each carving session and maintain its sharpness using a sharpening stone. Keep dry and safe from potential damaging conditions.
Use: This is your go-to tool for detailed work, offering precision with its straight blade. Great for outlines and fine carvings.
3. V-Tool
Care: Regularly clean and sharpen the V-shaped edge using suitable sharpening tools. Store safely to ensure the edge remains intact.
Use: This tool is all about texture and detail, allowing for sharp lines and intricate designs in your carvings.
4. Straight Gouge
Care: Clean after each use, especially the curved surface. Use rounded sharpening tools for the inner curve. Store in a way that the curved blade doesn’t get damaged.
Use: This tool lets you scoop out wood, giving depth and patterns. The curved edge can hollow out specific areas of your design.
5. Wooden Mallet
Care: Always store in a dry place. Sand any rough edges occasionally to ensure a smooth hitting surface.
Use: Used in conjunction with chisels, it provides the necessary force for deeper cuts and ensures controlled carving.
3. (b) How to Care and Use Sharpening Devices
Sharpening is a skill as vital as the carving itself. Using the right device and technique ensures your tools remain in top condition, allowing for precise and safe carvin. Here’s how to care for and use sharpening tools:
1. Sharpening Stone (e.g., Silicon Carbide, Aluminum Oxide)
Care: Clean after each use to remove metal particles. If used with oil or water, ensure the stone is thoroughly dried after each session. Store in a cool, dry place.
Use: Place the blade flat against the stone, tilting it slightly to match the blade’s angle. Move the blade back and forth across the stone’s surface in a controlled motion.
2. Arkansas Stone
Care: Regular cleaning with honing oil helps keep the stone’s surface smooth. For deeper cleans, warm soapy water can be used. Dry thoroughly before storing.
Use: Similar to sharpening stones, but some carvers prefer using water as a lubricant instead of oil. The technique remains the same: maintain the blade’s angle and ensure consistent strokes.
3. Japanese Water Stones
Care: These stones need to be soaked in water for about 10 minutes prior to use. After use, rinse them with water to remove any debris and allow them to air dry.
Use: Use the soaked stone to sharpen your tool, keeping a consistent angle. As you work, a slurry will form which helps in the sharpening process.
4. Ceramic Stone
Care: Can be used dry, but they must be washed often with water and a household cleaner. Ensure they’re completely dry before storing.
Use: These stones provide a very smooth edge. Use similar techniques as other stones, maintaining the blade’s angle and using even strokes.
5. Diamond Stone
Care: Cleaning is simple with soap and water. This also keeps the diamond particles exposed for effective sharpening.
Use: Diamond stones are great for quick sharpening. They can be used with a little water as lubrication. As always, keep the blade’s angle consistent.
4. Demonstrating Fundamental Wood Carving Techniques
For any budding wood carver, showcasing mastery over foundational cuts is essential. Here’s a guide on how to perform and demonstrate each of the core techniques:
1. Paring Cut
Description: This technique involves gently slicing wood towards yourself, ideal for refining edges and accessing tight spots.
How to Demonstrate: Choose a spot on your scrap wood. Anchor your elbows on your work surface for control, then take the knife and gently carve small shavings towards yourself. Always ensure you’re wearing a thumb guard for safety.
2. Basic (Push) Cut
Description: This is the most standard cut, where you push the blade away from yourself. The opposite thumb at the back of the blade offers added leverage.
How to Demonstrate: Start by holding the wood securely. With your other hand, place your thumb on the back of the blade and begin to carve away from yourself. You’ll see small pieces of wood being removed in a controlled manner.
3. “V” Cut
Description: This cut results in a V-shaped channel in the wood, and can be achieved using either a knife or a V-tool.
How to Demonstrate: With a knife, first make a straight scoreline. Then, angle the knife and carve one side of the groove, followed by the other side, meeting at the bottom to form a ‘V’. If using a V-tool, press it into the wood and slide, creating a V-shaped groove directly.
4. Stop Cut or Scoreline
Description: A stop cut, or scoreline, provides a boundary for other cuts, helping create distinct features in carving.
How to Demonstrate: Hold your knife vertically and make a clear, straight line on the wood. This line acts as a stopping point for other cuts. For a stop cut, make another slanted cut that meets the scoreline, creating a sharp edge.
Remwmber, when demonstrating these techniques to your counselor or anyone else, always prioritize safety. Use steady hands, make controlled cuts, and always be aware of where your fingers and hands are in relation to the blade.
5. Understanding Wood Varieties
Different woods have unique characteristics, such as grain structure, hardness, color, and workability. These attributes make certain woods more suitable for specific projects.
1. Hardwood vs. Softwood
- Hardwoods (like oak, maple, cherry): These are typically denser and are often used for projects requiring durability, like furniture. They can be more challenging to carve but offer a polished finish.
- Softwoods (like pine, cedar, spruce): Generally easier to carve and are often used for projects where intricate detailing is required or for beginners.
2. Grain Structure
The pattern and orientation of a wood’s grain can influence the final appearance of a project. Woods with a pronounced grain, like oak, can add an aesthetic appeal but might be trickier to carve.
3. Workability
Some woods, like basswood or butternut, are favored by carvers because they’re soft and don’t splinter easily. These are ideal for detailed carvings.
4. Color & Aesthetics
The natural hue of wood, such as the reddish tint of cherry or the pale color of pine, can influence the final look of a project.
5. Cost & Availability
Exotic woods might be desired for their unique appearance but can be expensive and harder to source. Local woods are often more affordable and readily available.
My Wood Choices for Projects 1 & 2
(Note: I am only providing examples here of explanations of projects that you can choose for requirements 6 and 7.)
For Project 1: I chose pine because it’s a softwood, making it easy to carve intricate patterns. Its light color also complements the design I had in mind, providing a beautiful backdrop to the carved details.
For Project 2: I opted for oak due to its durability and pronounced grain. This project required a robust wood that could withstand daily use, and the distinct grain of oak added an extra layer of aesthetic appeal.
Choosing the right wood is crucial, as it can influence the ease of carving, durability, and overall appearance of a project.
6. Crafting a Simple 3D Carving for My Merit Badge Project
Carving in the round refers to sculpting a three-dimensional figure that’s detailed and finished on all sides. For this merit badge, I had two options: devise my own design or pick a recommended project from the pamphlet.
After considering my skill level and the tools available, I opted to craft a small bird figure. Birds, with their varied shapes and textures, offer an exciting challenge, making them a popular choice for round carvings.
1. Sketching & Design
Before beginning the carving, I drew a simple bird design from various angles on paper. This helped in visualizing the end product and served as a guide during the carving process.
2. Selecting the Wood
I chose basswood for this project. It’s soft, has a fine grain, and is perfect for detailed carvings. Plus, its pale color provides an excellent base if I decide to paint or stain the bird later.
3. Rough Shaping
Using a basic cut and push cut, I removed larger chunks of wood to define the bird’s general shape.
4. Detailing
With the rough shape in place, I used V-cuts, stop cuts, and paring to carve finer details like feathers, eyes, and the beak.
5. Sanding & Finishing
After carving, I smoothed the bird using sandpaper, starting with a coarser grit and progressing to a finer one. This removed any sharp edges and gave the bird a polished look.
6. Optional Finishing Touches
While I kept my bird natural, one could paint, stain, or apply a protective finish to enhance the wood’s appearance and increase its lifespan.
7. Crafting a Simple Low-Relief Carving for My Merit Badge
Low-relief carving, also known as bas-relief, involves carving figures or objects that slightly stand out from a flat background. The depth is minimal, but the shadows and designs give a three-dimensional feel.
For this requirement, I opted for a low-relief carving of a tree, representing growth and endurance.
Steps to Craft the Low-Relief Carving:
1. Design & Preparation
I started by sketching a tree with its branches and roots on a wooden plank. The drawing served as my blueprint, guiding where to carve and what to leave raised.
2. Selecting the Wood
Cedar was my choice due to its even grain, which is essential for detailed low-relief carvings. The aromatic scent of cedar was an added bonus!
3. Outlining the Design
Using a scoreline technique, I outlined the tree’s design, ensuring the boundaries were clear.
4. Removing the Background
I employed the basic cut and push cut techniques to lower the area around the tree, making the tree design stand out.
5. Detailing the Tree
With the tree now prominent, I used V-cuts and paring to add details like the bark texture, leaf patterns, and intricate root designs.
6. Smoothing & Refining
After achieving the desired depth and details, I smoothed the carved areas using fine sandpaper, ensuring there were no rough patches or splinters.
7. Finishing Touches
I applied a light stain to enhance the wood’s natural color and make the tree design more pronounced. Following this, a clear protective finish was applied to protect the wood and give it a gentle shine.
Tools Wood Carving
Before you start working with wood, it’s important to know about the different tools you’ll use and how to take good care of them, especially how to make sure your knives stay sharp.
It’s also really important to set up a work space where you can be safe and focus on what you’re doing. The first thing to learn about tools is choosing the right pocketknife for yourself.
1. Pocketknives
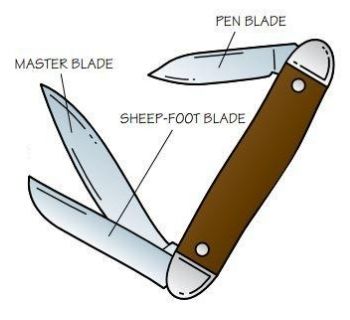
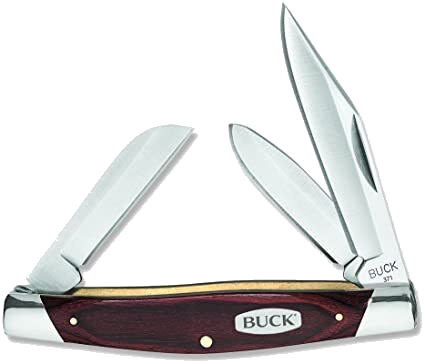
Pocketknives come in different styles. If you’re carving, the best type is the “whittler’s knife” which has three different blades on it.
The “Scout whittler’s knife” is great for beginners. It has a big blade that’s good for many things, often called a “master blade”.
Another blade on it has a straight edge, named “sheep-foot blade”. People use it to cut and shape wood, especially to remove parts they don’t need. This blade often becomes a favorite for many carvers.
The last blade on this knife is super useful for small details, like carving out eyes. But remember, don’t use a “stockman’s knife”. It might look like the whittler’s knife but isn’t good for detailed work.
2. Other Carving Tools
You might want more than just a pocketknife for carving. But, don’t rush and buy a big set of carving tools right away. Maybe you won’t even use all the tools in those sets.
A good start would be getting a basic carving knife, a V-tool, and a gouge. As you learn more, you can buy what you really need.
Think about other handy tools like rulers, pencils, clamps, and even rubber mats. With time, you’ll see which tools are really helpful.
For carving, there are a few must-haves:
A carver also needs:
- A wooden mallet
- A flat wood file
- Medium and fine sandpaper
- Oil stones
- Slips for sharpening chisels and fine tools
The wooden mallet is used to hit chisels when your hand isn’t enough. The flat file helps smooth out bumps and mistakes.
3. Arranging the Work Space
When carving, you need a steady place to work. Use a good table and chair. Also, make sure you have enough light so you can clearly see your work. It’s best if your workspace is quiet and free from distractions. This helps you stay focused on your carving.
Care of Tools
Even if you don’t have your own tools for this badge, it’s good to know how to look after and sharpen any tools you might use. Before you start using most knives, they need to be made sharp. This can take some time, so be patient.
It’s a good idea to regularly check your tools to make sure they’re clean and free from rust. If you keep a pocketknife in your pocket, it might collect bits of fuzz or lint. To clean it, put a little sharpening oil on it, wait a bit, and then wipe away any extra oil.
To keep your tools in tip-top shape:
- Make sure they’re always dry.
- Clean off any fingerprints or wet spots with a cloth.
- Put a little bit of oil on the knife’s blade and moving parts.
For bigger tools like chisels or gouges, wrap them in a soft cloth when you’re not using them. This stops them from getting banged up or hurting other tools.
1. When is a Tool Sharp?
Before you sharpen a knife or tool, check if it’s already sharp. Here’s a simple test:
- Stand where there’s bright light, like near a window or outside in the sun.
- Hold the knife or tool up, with the sharp edge facing the sky.
- Look at it closely. If you see any light reflecting off the edge, it means there’s a dull spot that needs sharpening.
Another good way to check is by trying the tool on some wood. Make a few test cuts on a piece of wood. If it’s hard to cut or the cuts aren’t smooth, it probably needs sharpening.
Remember, when you buy a new knife, it might not be ready for carving right away. The blade is usually made for general use, not just carving. Some knives are made to last longer when cutting tough stuff like ropes or tree bark, but they might not be super sharp.
2. The Carving Edge
If you want to carve with your knife, it needs a special edge called a “carving edge”. This means making the blade a bit thinner by removing some metal. It helps the knife slide through wood more easily.
To give your knife this special edge, you’ll need a set of sharpening stones. You can find them at many stores that sell general items or sports gear.
Usually, these sets have two stones. The bigger one shapes the blade the way you want. After that, you use the smaller stone to finish and smooth out the edge.
3. Sharpening Stones
Using the right sharpening stone is key. There are many types, and here’s a breakdown:
- Silicon Carbide (Crystolon): This is a blue-black stone. It comes in different roughness levels, and there’s even a kind you can get as a sheet. Use it with oil.
- Aluminum Oxide (India): This can be reddish-brown, gray, or white. It’s the same material as synthetic sapphires. Like the Crystolon, you use it with oil.
- Arkansas (Novaculite): A natural stone from Arkansas, USA. It can be white to black. Despite the color, they’re all equally hard. Most people use oil, but some prefer water.
- Ouachita: Like the Arkansas stone but rougher. It’s also from Arkansas. You use this one with water.
- Japanese Water Stones: These can be natural or man-made. They range from very rough to super fine. The extra fine ones have a special polish in them. Before using, soak them in water for about 5-10 minutes.
- Nagura: A man-made stone from Japan. You rub it on a wet stone to create a paste, which makes sharpening quicker and more even.
- Ceramic: Made from aluminum oxide. Use it dry, but remember to clean it with water, a scrub pad, and normal household cleaner. Lots of carvers love this one.
- Diamond: These have tiny diamond bits stuck to a plastic base. Use them with water and clean with soap. They’re great for making other stones flat again.
4. Honing Oil
Honing oil is like a special helper for sharpening stones. When you use it, it keeps the stones in good shape by cleaning them and filling tiny holes on their surface. This way, the stone stays smooth and works well for a long time.
Some people who carve wood like to use either oil or water on specific stones named Arkansas and Ouachita.
You can make your own honing oil! Just mix half regular oil (like 30-weight) and half kerosene. But be careful: there are some stones that are already soaked in oil. Don’t use these for delicate carving tools. They’re meant for bigger tools like axes.
Also Read: Art Merit Badge
5. Care of Stones
When you get a new sharpening stone and plan to use oil with it, first give it a light oiling. Then, wrap it in kitchen foil and store it until it’s fully soaked with the oil. It’s a good idea to keep your stones in boxes so they don’t get dusty or dry out.
If your stone’s surface gets a bit rough over time, you can smooth it again. You can use another kind of stone called a diamond stone. If it’s not too worn out, you can also rub it with a special cloth called emery cloth or a special paper called silicon carbide paper.
Sometimes, spreading a powder called carborundum on a flat glass or metal surface and rubbing your stone on it can also help. Remember to use some water to help the process.
Always wet your stone with oil or water before sharpening. Follow what the stone’s maker recommends. Keeping the stone wet stops the tool’s blade from getting too hot while sharpening. If it gets too hot, the blade might lose its sharpness.
Be careful with hot blades! That’s why it’s not a good idea to put carving knives in the dishwasher.
Lastly, after sharpening, gently clean any leftover oil from the stone. Don’t press hard because the oil might have tiny bits of metal in it, and you don’t want to push these into the stone.
Basic Cuts
In wood carving, there are five cuts that you are most likely to use:
- Paring cut
- Basic cut
- Scoreline
- Stop cut
- V-cut
When practicing making these cuts, remember to keep your elbows on the table as much as possible. This keeps you from taking long, dangerous strokes. Take your time and make short shallow cuts.
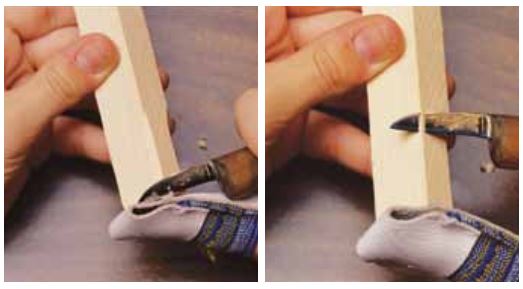
1. Paring cut
Take very small cuts toward you. This enables you to get into spaces that another stroke cannot. (Note the thumb guard the Scout is wearing to protect himself.)
2. Basic cut
This cut is also known as the push cut. This cut is away from you, taking small pieces of wood. By placing the opposite thumb on the back of the blade, you are creating a lever and making it easier to remove the wood from your project.
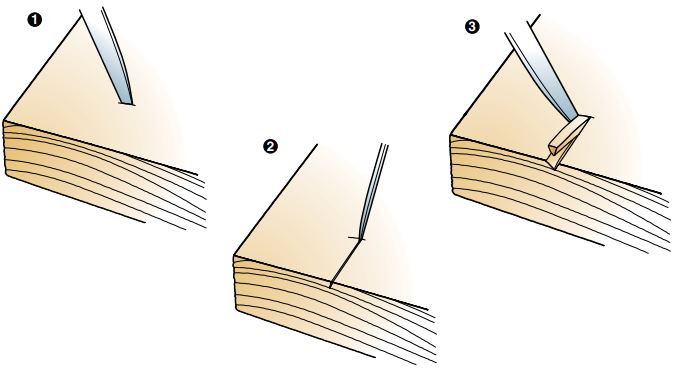
3. Scoreline
This cut gives you a line that you can cut back to, to make a clear line or feature.
4. Stop cut
This cut is used mostly with scoring a line. You will cut back to the line that you have scored. Most of the time, small pieces of wood will fall out. You can also use this cut
when using gouges.
5. V-cut
You can make a V-cut either with a knife or with a V-tool. To use a knife, you will make three cuts:
- Hold the knife straight up and down and score a line.
- Put the knife in a pencil grip at a similar angle you would use to write. A right-handed person, for example, would do this on the right of the first cut. Remove wood in a wedge shape down to the original cut.
- When possible, turn the wood around to make a similar cut on the other side. Or, repeat the cut on the left side.
Using a V-tool involves fewer steps:
- Make a little cut and stop at the place where you want the V-cut to end.
- Guide the tool down to the cut stop, making the V-cut.
If you are interested in making Eagle Head you can visit this site.


