Welding Merit Badge – You may wonder what it means to weld. Welding is the process of joining with a weld-joining or combining similar pieces of metal by heating them with a flame torch or an electric current, then hammering or pressing them together while they are soft.
Welding can also be done by melting plastic or metal into the joint of similar material. The temperature range for welding is 3,000 to 10,000 degrees Fahrenheit.
Welding plays a major role in our modern world, and mastery of the skill can lead to exciting career opportunities.
Someday, you may have an opportunity to experience exciting new career paths in welding. There are more than 80 welding, cutting, and welding-related processes, only a few of which will be covered in this article.
Welding Merit Badge Requirements
- Do the following:
- Explain to your counselor the hazards you are most likely to encounter while welding, and what you should do to anticipate, help prevent, mitigate, or lessen these hazards.
- Show that you know first aid for, and the prevention of, injuries or illnesses that could occur while welding, including electrical shock, eye injuries, burns, fume inhalation, dizziness, skin irritation, and exposure to hazardous chemicals, including filler metals and welding gases.
- Do the following:
- With your counselor, discuss general safety precautions and Safety Data Sheets related to welding. Explain the importance of the SDS.
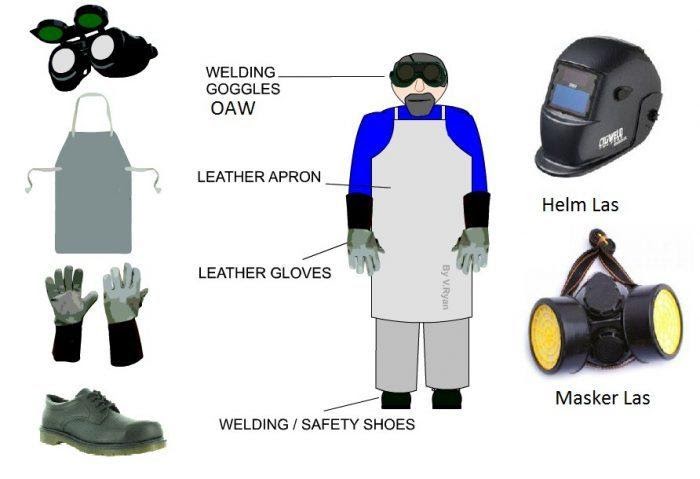
- Describe the appropriate safety gear and clothing that must be worn when welding. Then, present yourself properly dressed for welding in protective equipment, clothing, and footwear.
- Explain and demonstrate the proper care and storage of welding equipment, tools, and protective clothing and footwear.
- Explain the terms welding, electrode, slag, and oxidation. Describe the welding process, how heat is generated, what kind of filler metal is added (if any), and what protects the molten metal from the atmosphere.
- Name the different mechanical and thermal cutting methods. Choose one method and describe how to use the process. Discuss one advantage and one limitation of this process.
- Do the following:
- Select two welding processes, and make a list of the different components of the equipment required for each process. Discuss one advantage and one limitation for each process.
- Choose one welding process. Set up the process you have chosen, including gas regulators, work clamps, cables, filler materials, and equipment settings. Have your counselor inspect and approve the area for the welding process you have chosen.
- After successfully completing requirements 1 through 5, use the equipment you prepared for the welding process in 5b to do the following:
- Using a metal scribe or soapstone, sketch your initial onto a metal plate, and weld a bead on the plate following the pattern of your initial.
- Cover a small plate (approximately 3″ x 3″ x 1/4″) with weld beads side by side.
- Tack two plates together in a square groove butt joint.
- Weld the two plates together from 6c on both sides.
- Tack two plates together in a T joint, have your counselor inspect it, then weld a T joint with fillet weld on both sides.
- Tack two plates together in a lap joint, have your counselor inspect it, then weld a lap joint with fillet weld on both sides.
- Do the following:
- Find out about three career opportunities in the welding industry. Pick one and find out the education, training, and experience required for this profession. Discuss this with your counselor, and explain why the profession might interest you.
- Discuss the role of the American Welding Society in the welding profession.
Staying Safe While Welding
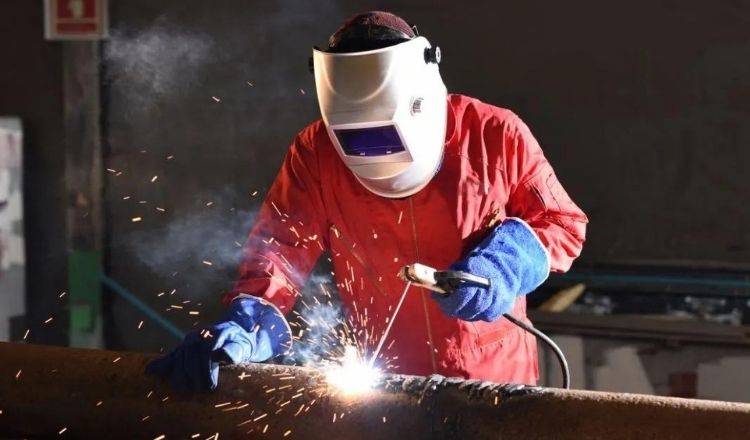
Arc welding uses an electric current that generates intense heat and emits intense light, both extremely dangerous. It is essential that you thoroughly understand all safety precautions before you begin.
Carelessness or ignoring safety practices can be damaging or even fatal to you and to anyone who is nearby.
Always read the warning labels for every piece of equipment or component and filler metals you use. If you are ever in doubt about a safety issue, ask your merit badge counselor. Let’s take a look at some of the risks.
1. Safety Basics
Arc welding, oxy-fuel welding, and oxy-fuel cutting all share one characteristic: The harmful and intense infrared and ultraviolet rays that are emitted by the welding process will damage unprotected eyes and exposed skin, kind of like getting a sunburn-only worse.
When you are welding, you must always protect yourself. The information presented here will help you stay safe during welding activities.
| Always have a fire extinguisher nearby. When welding, you must always be conscious of fire protection and keep a class ABC fire extinguisher within easy reach, mounted at shoulder level. Fire extinguishers should be checked monthly to ensure the tank is full and the pressure is normal. If anything appears out of the ordinary, replace the extinguisher or have it professionally serviced. |
| Button up and wear the proper clothing for protection from UV and infrared rays. Long-sleeved shirts of tightly woven, 100 percent wool (never synthetic fabrics) with buttoned cuffs and a collar (no pockets) provide the best protection from UV and infrared radiation, flying sparks, hot or melted metal, and flames. Wear pants with no cuffs (which can collect sparks and hot metal), and do not tuck pants into boots or shoes. It is best to wear dark colors, which will not reflect as much light as light-colored clothing. Wear a cap to help protect your head. |
| During arc welding, never roll up your sleeves or cuff your pants. All clothing should be completely buttoned with no frays or tatters. It’s best to wear a shirt that has no pockets. If your shirt has pockets, close, button, or tape them shut to prevent sparks from falling into them. During welding, any exposed skin may get burned from spatter and UV rays. Always protect yourself. |
| Wear flame-resistant leather gloves. Keep your welding gloves dry, and check them for tears and rips. Take care of your gloves. If leather welding gloves get too close to excessive heat, they will shrink and distort, making them uncomfortable and eventually unusable. |
| Wear the proper footwear. Fully laced high-top boots provide the best protection. Keep them dry. Because sparks can fall into low-top shoes, wear smooth-top leather work boots, preferably with steel toes. Wear pants outside your work boots to prevent sparks from falling into your boots. Store boots in a clean, dry area. |
| Never handle hot metal! Welding gloves are not intended for handling hot metal. Use pliers or vise grips when handling parts that have just been welded. |
| Do not leave any skin exposed. A welding helmet or welding shield is designed to protect your eyes and face from the arc’s harmful rays and intense light. You must wear face and eye protection during any welding process. Tinted glasses with proper shade or goggles must be used with gas welding and cutting. |
| Always wear an approved welding helmet while welding. Wearing a welding helmet allows you to safely view the arc through a window with a filter plate that removes damaging rays and light. The filter plate is protected from spatter and debris by a clear lens made of plastic or glass. Filter plates are available in various shades, ranging from darker to lighter. The higher the shade’s number, the more shading it provides. |
2. Risk of Burns and Fire
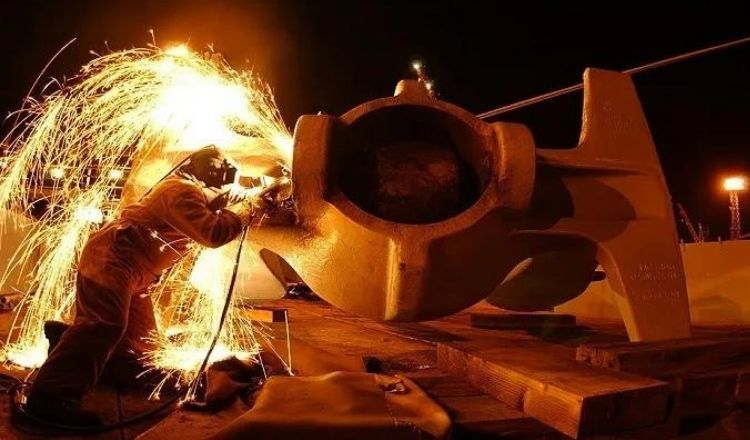
The electric arc is extremely hot. Temperatures can reach 10,000 degrees Fahrenheit or higher. Exposure to this intense heat poses an extreme risk of burns or of starting a fire from the spatter.
Be sure your work area is free of combustible and flammable materials, including gas, oil, and grease, and that these materials are at least 35 feet from any welding activity. Commonly ignited substances are trash, wood, fabric, boxes, papers, rags, plastics, and chemicals.
If you are welding in a questionable area, place fire shields or flame-resistant blankets around the welding area, and have a responsible fire watcher keep watch for you. Continue inspecting for fire for 30 minutes after welding.
A. First Aid for Thermal Bums
Superficial burns are mild burns that affect only the outer layer of the skin. Treat them by holding the burn under cold water or applying cool, wet compresses until the pain eases.
Partial-thickness burns are more serious than superficial burns and affect the outer layer of skin and part of the layer of skin below it. They typically include reddening and blistering of the skin.
To treat such burns, first, remove the person from the source of the burn. Cool the burned area with cold, running water until the pain is relieved. Let the burn dry, then protect it with a loosely applied, sterile gauze pad and bandage
Full-thickness burns are very serious. They destroy the outer layer of skin and the layer below it. A victim who has been exposed to open flames, electricity, or chemicals may sustain full-thickness burns.
The skin may be burned away and the flesh charred. If nerves are damaged, the victim may feel no pain. Such burns constitute a medical emergency.
Do not try to remove any clothing, as it may be sticking to the victim’s flesh. After cooling the burn, cover the burned area with dry, sterile dressings. Seek immediate medical attention.
Also Read: Fire Safety Merit Badge
3. Risk of Electrical Shock
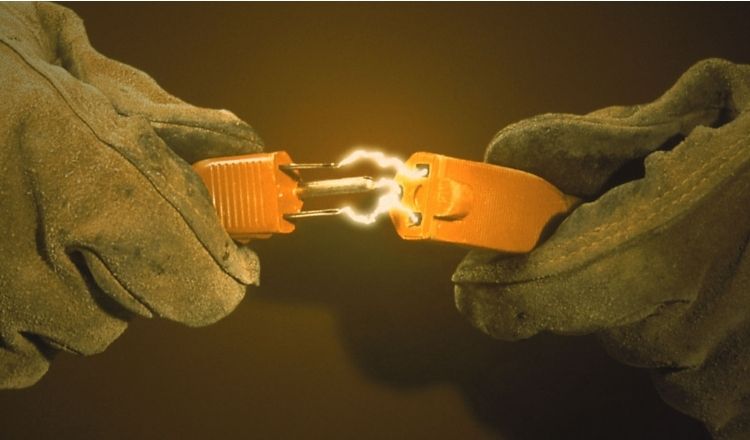
One of the most serious risks to the welder is electrical shock. An electrical shock of more than 30 volts can be fatal. Arc welding presents the risk of both primary voltage shock and secondary voltage shock.
Primary voltage shock occurs when the power is on and someone simultaneously touches a lead inside the welding machine and either the welding machine or other grounded metal. The shock can be between 120 and 480 volts.
Secondary voltage shock will occur if you touch the electrode while another part of your body touches the workpiece.
If you touch both of these components at the same time, you will receive an electrical shock ranging from 60 to 100 volts. The higher the voltage in an electrical circuit, the more serious the electrical shock will be.
Always remember that electricity easily flows through the water. Therefore, when you are arc welding, you must stay dry. Never weld with wet gloves. Even wetness from perspiration is dangerous. Wear proper welding clothing to maintain insulation between yourself and your work.
Before you begin welding, be sure your work area is clean and dry. Inspect all of the equipment you will be using. Cables, electrodes, and electrode holders must be dry and in good condition.
Ask your counselor to make a visual inspection and to replace any damaged components. Do not attempt to repair a welding machine yourself.
A. First Aid for Electrical Shock
If electricity travels through a part of your body, you can get an electrical burn. Besides a burn, too much electricity can even stop the heart from beating correctly or damage other internal organs.
Superficial and partial thickness burns from electricity look like burns from too much heat; the skin may look charred. Full-thickness electrical burns may not leave charred skin. Instead, the skin can look leathery and white and be hard to the touch.
Call 911 or the local emergency-response number if someone has an electrical burn.
4. Risk of Explosion
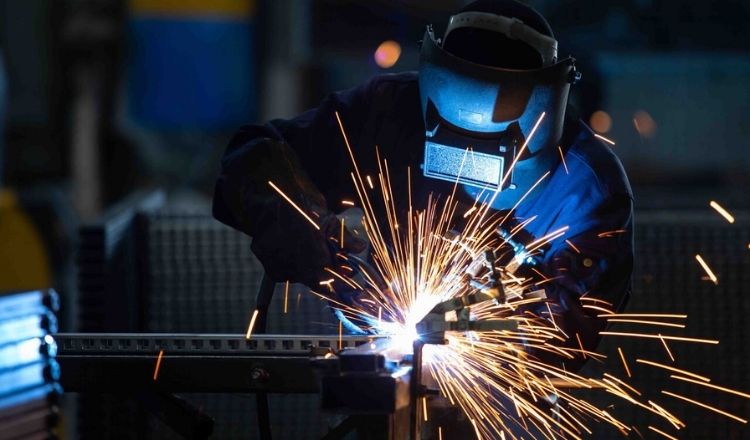
The shielding gases used in arc welding are commonly inert or only slightly reactive. However, the cylinders that contain these gases are under intense pressure. Always handle cylinders with care. Do not heat or weld on a cylinder.
Above all, learn about the materials you are welding and know the risks involved when working with them. Make sure you have the correct base metals, electrodes, and shielding gases.
This information can be found in the chapter “Welding and Cutting Methods.” Never weld near flammable or combustible materials. Notify your merit badge counselor if you detect any damage to your welding equipment.
5. Material Safety Data Sheets
Material Safety Data Sheets are available for the filler materials you may be using. The MSDS gives the proper procedures for working with, handling, storing, and disposing of materials.
The MSDS will also alert the user to any hazardous substances the product may contain, such as a hazardous material in a particular welding rod or that could evolve during welding with a particular welding rod.
The format of the MSDS may vary, but by U.S. law, all must include certain information presented in eight specific sections. Some internationally formatted sheets will have up to 16 sections.
Here are the eight required sections, although many manufacturers include additional information, such as emergency and first-aid procedures.
| Manufacturer Information. Identifies the material and lists the manufacturer’s name, address, and emergency telephone number. |
| Hazardous Ingredients. Lists the hazardous ingredients in the material and some of the exposure limits (such as the permissible exposure limit, or PEL). |
| Physical and Chemical Characteristics. Tells what the material will look and smell like, whether it is a liquid or solid, the melting point (if it is solid), and what will cause it to react. |
| Fire and Explosion Hazards. Tells whether the material is flammable and lists the flashpoint, firefighting materials and methods, and any unusual burning characteristics. |
| Reactivity. Tells how other chemicals will react with the material. |
| Health Hazards. Lists known routes of entry into the human body and the health risks from each, and lists any cancer research that might have been done on the material. Describes how to recognize and treat overexposure. |
| Precautions for Safe Handling and Use. Lists procedures to use in case of accidental spills and give information about proper disposal. |
| Control Measures. Lists ways to avoid making contact with the material, such as using respirators, wearing gloves, and working in a well-ventilated area. |
Welding and Cutting Methods
Welding has come a long way since its early Bronze Age beginning. Forge welding is one of the oldest and simplest methods of joining metals to create one “new” piece. The forge welder heats two or more pieces of metal and hammers them together.
Today, forge welding has been largely replaced by gas and electric welding, advances made during the Industrial Revolution.
This manual describes a number of conventional welding and cutting methods. Each offers an opportunity for you to learn new skills as you create, build, and alter objects or make artworks. Welding and cutting are great skills to master.
Here are some of the more common welding and cutting processes used in a garage or shop.
1. Oxy-Fuel Welding
Oxy-fuel welding (sometimes called oxyacetylene or gas welding) and oxy-fuel cutting use fuel gases and oxygen to weld and cut metals. This process involves oxidation or the combination of a substance with oxygen.
Oxy-fuel welding relies on the chemical reaction between the oxyacetylene flame and the base metal. This provides the heat to melt the base and is usually a filler metal. Welders use this process to weld sheet and thin plates, tubes, and small-diameter pipes.
Advantages and Disadvantages of Oxyfuel Welding
The primary advantage of oxy-fuel welding is that it allows good control of the heat input. You can learn how to handle a torch and control your weld at a slow speed.
Skilled operators with gentle movements can control the weld-bead size, shape, and weld puddle. This method is also inexpensive and portable when compared with other methods, and can even be set up in a garage shop.
Oxy-fuel welding has its disadvantages:
- It requires a high skill level to minimize discontinuities.
- The OAW flame is not as concentrated as an electric arc.
- It is not economical for thick section welding (more than % an inch thick).
- The welding speed is slower than the arc welding speed.
- Weld-metal properties are difficult to control.
Oxyfuel Welding Equipment
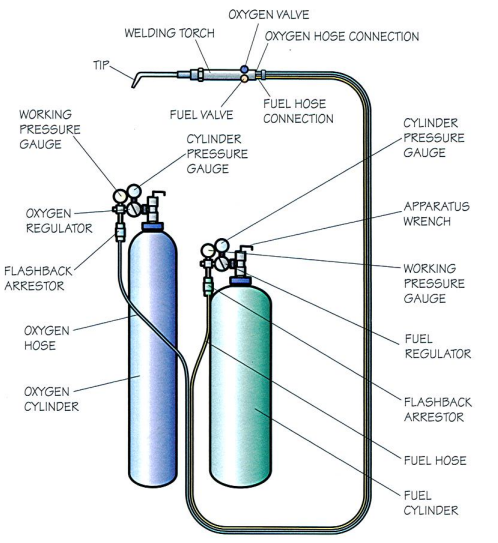
Oxy-fuel welding requires two cylinders of gas-one for oxygen and one for fuel gas. It also requires gas-flow regulators, hoses, check valves, flashback arrestors, and a welding torch-and-tip assembly. Oxy-fuel torches may be light or heavy-duty.
Nozzles and tips attach to the torch head. Gas flows through the welding tip just prior to ignition and burning. Manufacturers specify tips by orifice diameter or drill size.
Recommended tip sizes are based on material thickness. The fuel-gas hose is red; the oxygen hose is green. The oxygen hose is for use with all fuel gases; R-grade is for acetylene only.
For safety, the oxygen fitting has right-hand threads; when you turn the fitting to the right, it will tighten. The fuel-gas fitting has left-hand threads with grooved nuts; when you turn it to the left, it will tighten.
This prevents someone from accidentally connecting the fuel-gas to the oxygen receptacle and vice versa.
In oxy-fuel welding, a welding torch is used to fuse the base metals by heating the two pieces to a temperature that produces a shared molten pool of metal. The molten pool is generally supplied with additional filler metal.
When you are finished using the welding torch, turn off the flame, coil the hoses, and store them on the appropriate brackets on the torch cart.
If there are no brackets, store the torch and hoses away from any heat sources, out of the way to prevent a tripping hazard. Turn off the gas cylinders. Store all hand tools safely in the appropriate place in a toolbox or cabinet.
If there is a weld spatter on the welding table, grind off the table to remove the weld spatter. With a hand broom, sweep off the welding table. With a floor broom, sweep the floor. Always leave the area neat and clean, ready for the next welder and project.
2. Oxy-Fuel Cutting
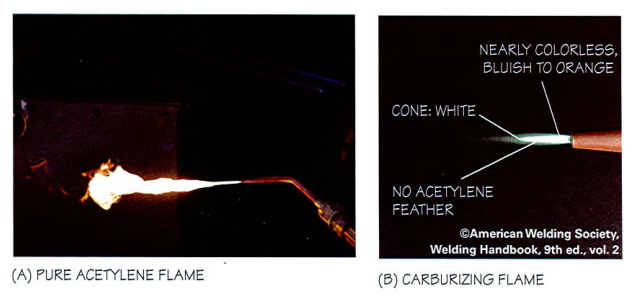
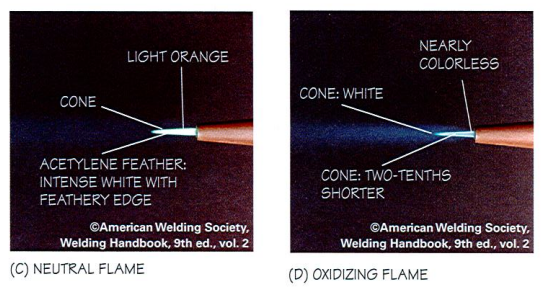
In oxy-fuel cutting, a cutting torch is used to heat metal to kindling temperature (generally red for iron alloys). A stream of oxygen is then trained on the metal to oxidize (burn) the metal. The sag, or burned metal, is removed from the cut (kerf).
The setup for manual oxy-fuel cutting is similar to oxy-fuel welding, although the torch attachment is different.
The cutting torch attachment functions are designed to (1) control the flow and mixture of fuel gas and preheat the oxygen, (2) control the flow of cutting oxygen, and (3) discharge the gases through the cutting tip at the proper speed and volume tor preheating and cutting.
Cutting to Size
If you are working with steel plates, tubing, or iron, you may need to cut some materials to size before welding. Cuts can be made mechanically or thermally.
Thermal cutting confines cut to a narrow, well-defined zone of controlled width, or kerf. Oxy-fuel cutting and plasma arc cutting are two widely used thermal methods. Oxy-fuel cutting severs ferrous metals by oxidizing the iron in oxygen to form iron oxide slag.
Advantages and Disadvantages of Oxyfuel Cutting
The advantages to oxy-fuel cutting are its low cost, portability, and versatility of cutting direction and size.
However, the disadvantages of oxy-fuel cutting are p0orer tolerances compared with machine tools, potential fire, fume and burn hazards and the requirements of adequate ventilation.
3. Shielded Metal Arc Welding
In 1890, C.L. Coffin of Detroit was awarded the first U.S. patent for an arc welding process using a metal electrode. This was the first record of the metal melted from the electrode carried across the arc to deposit filler metal in the joint to make a weld.
By 1900, shielded metal arc welding (SMAW)-the process of using a coated metal electrode-had been developed in Great Britain. A thin coating of clay or lime was applied to the bare rod by dipping short lengths into a thick paste and allowing the coating to dry.
This coating provided a more stable arc with the gas and flux shielding to protect the molten weld puddle.
Advantages and Disadvantages of Shielded Metal Arc Welding
Because of its versatility (a wide variety of metals can be used) and simplicity, shielded metal arc welding (often called “stick welding”) remains one of the world’s most popular and useful welding processes.
It involves using the heat of an electric arc between a covered metal electrode and the work. SMAW equipment is also inexpensive and can be used in remote areas.
Gasoline and diesel-powered generator/welding equipment make the process portable; small, lightweight inverter power sources are available.
The process is less sensitive to wind and draft than gas-shielded arc processes, making it more suitable to the outdoors than other methods. Compared with its advantages, shielded arc welding has a few disadvantages.
The fumes this process emits can make it undesirable to weld indoors, and the length of the electrodes can limit its productivity.
If not cleaned properly, a weld can also contain slag inclusions or pockets of material (most often slag or flux) that get trapped in and between the weld metal and the base metal, making the weld porous and weak.
4. Gas Metal Arc Welding
In 1948, using the principle of shielding the welding arc with inert gas, gas metal arc welding (GMAW) was developed.
In this method, a continuously fed wire electrode was used to create the electric arc and as a consumable filler metal. Improvements in welding power supplies and the use of smaller-diameter wires greatly improved the process.
Because of the high cost of inert gases (helium and argon), this process was first developed to join nonferrous metals.
Later developments allowed the use of less expensive CO, shielding gases with steel, which led to variations of the process, including spray-arc, short-circuiting arc, and pulsed-arc transfers.
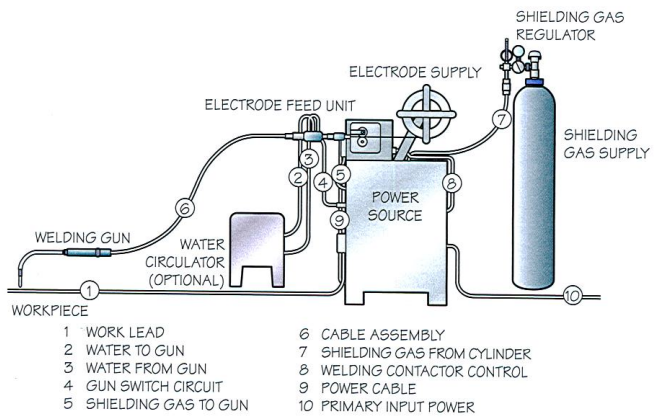
Gas metal arc welding uses the heat of an electric arc between a continuously fed bare wire filler-metal electrode and the work. Arc shielding comes from externally supplied gas.
A variation of gas metal arc welding uses a tubular electrode containing metallic powders that also requires a gas shield to protect the molten weld pool from atmospheric contamination.
For most home and shop applications, the power source and wire feeder controller automatically control the arc length and electrode feed.
Advantages and Disadvantages of Gas Metal Arc Welding
Gas metal arc welding is useful when the presence of hydrogen could cause problems. When no slag is present as with shielded metal arc welding, the welder can more easily observe the action of the arc and the weld puddle to improve control.
With little or no cleaning after welding, overall operator productivity is greatly improved. Efficiency increases because the continuous spool of wire does not require changing as often as the individual electrodes used in shielded metal arc welding.
Gas metal arc welding has its disadvantages. For one, it can result in most of the common weld discontinuities except slag inclusions. Welding without adequate shielding permits atmospheric oxygen and nitrogen to dissolve in the molten metal, resulting in porosity.
Higher shielding gas flow rates may also result in porosity, due to the vortex action that draws atmospheric gases into the arc region. Drafts or wind may disperse shielding gases, making gas metal arc welding unsuitable for field welding.
Incomplete fusion is possible, especially in welds made with the short-circuiting transfer. The presence of undercut and underfill reflects poor welding technique. Overlap is more prevalent in globular transfer and with the short-circuiting arc.
The equipment used is more complex than that used for shielded metal arc welding, increasing the possibility of mechanical problems that can affect quality.
Equipment For Gas Metal Arc Welding
Gas metal arc welding requires a welding power supply, wire feeder, welding gun, a supply of shielding gas with flow meter and regulator, electric cables, and hoses to convey the shielding gas and cooling water.
The welding gun guides filler wire and shielding gas into the weld puddle, transmitting current through a cable from the power source. High-amperage guns come with tubing for water to cool the gun.
Stored under pressure for ready access in cylinders or in bulk containers, shielding gas travels through hoses, guns, and into the weld zone. Regulators and flow meters control gas flow.
Cables are constructed of drawn copper strands. The electrode lead carries current to the gun; the work lead, grounded, completes the circuit.
Gas hoses with accessories such as connectors and clamps route the shielding gas from the cylinder or tank to the welding gun.
Water for cooling high-amperage guns comes through a 1exible hose. Gas metal are welding typically uses solid wire, spooled or reeled, for continuous feeding to the gun, with diameters from 0.035 to 1/16 inch.
5. Flux-Cored Arc Welding
After the introduction of CO2 with gas metal arc welding, flux-cored arc welding (FCAW), a variation using a special electrode wire, was developed. This wire was tubular in cross-section, with the fluxing agents on the inside.
More developments eliminated the external gas, leading to the self-shielded welding wire. Flux-cored arc welding uses the heat of an arc between the electrode wire and the work.
Flux-cored arc welding owes its versatility to the wide variety of ingredients that can be included in the core of a tubular electrode.
The tube contains granular flux, deoxidizers, and alloying elements within the tubular wire. The selection of filler alloys depends on the base metal composition, base metal cleanliness, thickness, and service.
Advantages and Disadvantages of Flux-Cored Arc Welding
Due to increased deposition rates and a high tolerance for contamination, flux-cored arc welding has replaced shielded metal arc welding and gas metal arc welding in many applications.
Flux-cored arc welding can be used in both shop and field applications and provides high productivity in terms of the amount of weld metal that can be deposited in a given time, particularly for the handheld process.
This process is characterized by an aggressive, deeply penetrating arc that tends to reduce the possibility of fusion-type discontinuities. Flux-cored arc welding can be used in all positions.
As for the disadvantages of flux-cored arc welding, because the flux is present during flux-cored arc welding, a layer of solidified slag must be removed.
The flux also generates a significant amount of smoke, which can be hazardous and can reduce the welder’s visibility, making the weld puddle more difficult to observe.
Often, welders use welding guns equipped with built-in fume extractors ducted to a filter canister and an exhaust pump.
6. Plasma Arc Cutting
Plasma arc cutting uses the heat of a plasma arc (40,000 degrees Fahrenheit) to cut through any metal, ferrous or nonferrous.
The plasma arc torch, which features a copper electrode recessed into a copper tip with a small opening, constricts the plasma gas in order to heat and ionize it. A trigger switch controls most manual torches: Press to Start the gas and cutting arc; release to stop.
A pilot is established, and when the torch is close enough to the workpiece that the pilot arc touches it, an electrically conductive path from the electrode to the workpiece is created.
The material melts and the cuttin8 gas blows the molten metal away. The plasma gas cuts a bevel on one side of the kerf and a right-angle edge on the opposite side.
The gas swirls clockwise, placing the bevel on the left. This requires the worker to plan for the bevel on the scrap side of the cut.
The welder can rate the cut quality according to surface smoothness, kerf width, the parallelism of faces, adherence of dross to the cut bottom, and sharpness of the bottom faces.
Advantages and Disadvantages of Plasma Arc Welding
Plasma arc cutting is faster than other types of thermal cutting for material less than 1 inch (25.4 mm) thick. Because it works with a high-velocity jet of gas, the plasma arc cuts molten material without preheating Its disadvantages are that plasma arc cutting is noisy, bright, and hot.
All operators must wear ear protection (earplugs) a shaded face shield or helmet, and protective clothing.
This method also involves hazards such as fire, electric shock, intense light, fumes, gases, and high noise levels.
Another disadvantage i that the equipment costs more than oxy-fuel cutting equipment, and setups require both compressed air or gas and electrical power.
7. Submerged Arc Welding
In the 1930s, the automatic process of submerged arc welding (SAW) was developed and became popular in the piping and shipyard industries.
In this process, the electric arc is covered by a powdered flux that protects the molten weld pool from the detrimental effects of the atmosphere. It is useful for filling joints in heavy plates and pipes.
8. Carbon Arc Welding
The production of an arc between two carbon electrodes using a battery was first credited to the British chemist Sir Humphry Davy in 1800.
In 1885, Russian researcher Nikolai Benardo, working in a French laboratory, was granted a patent for carbon arc welding to join lead plates together for storage batteries.
Efforts were also made to join iron components, and the process became popular in the late 1890s and early 1900s.
9. Gas Tungsten Arc Welding
Gas tungsten arc welding (GTAW) uses a non-consumable tungsten electrode to produce an is to melt the base metal. The weld area is protected from atmospheric contamination by a shielding gas (usually argon and a filler metal).
Plasma arc welding is a variation of gas tungsten arc welding whereby the electric arc is contained inside the torch and the heat energy 1s transferred to the work through a plasma jet.
This process can be used for metal spraying and for cutting. The plasma arc has a higher temperature than a tungsten arc.


